Cheap Tools to Make Gunsmithing Easier
Gunsmithing can be hard, especially if you are new at it, and even more so if you are learning how to do it on your own. Fortunately, there are several cheap tools that can make gunsmithing much easier. You can make some of these tools on your own, while others are available online or at your local hardware store.
Some of these are not what you would consider “traditional” gunsmithing tools. They are simply items that I have found to make certain jobs easier.
Magnetizer/Demagnetizer

One day, I decided to do a spring replacement on my carry gun. I kept getting frustrated because the springs and other small parts kept getting stuck to my tools. Either the springs or tools had a very low magnetic charge, which made my job very difficult.
One very useful and cheap gunsmithing tool I don’t see many people mention is a magnetizer/demagnetizer. They are usually used on screwdrivers, but they can really reduce anger and rage when working with tiny gun parts. With a magnetizer/demagnetizer, you just slide the part through the steps on the tool, and it should demagnetize anything that will fit inside of it. The best thing about these is that they only cost a couple of dollars
Slave Pins

Slave pins are some other cheap gunsmithing tools that can make your life easier. A slave pin is an assembly aid that makes firearm reassembly much less frustrating. In fact, firearms would be virtually impossible to reassemble without them. They hold springs and other small parts in position during assembly. You can use a wide variety of items to fill the role of a slave pin, but I have found old drill bits to function very well once they are properly sized and shaped.
Related: Companies that Make the Best Gunsmithing Tools
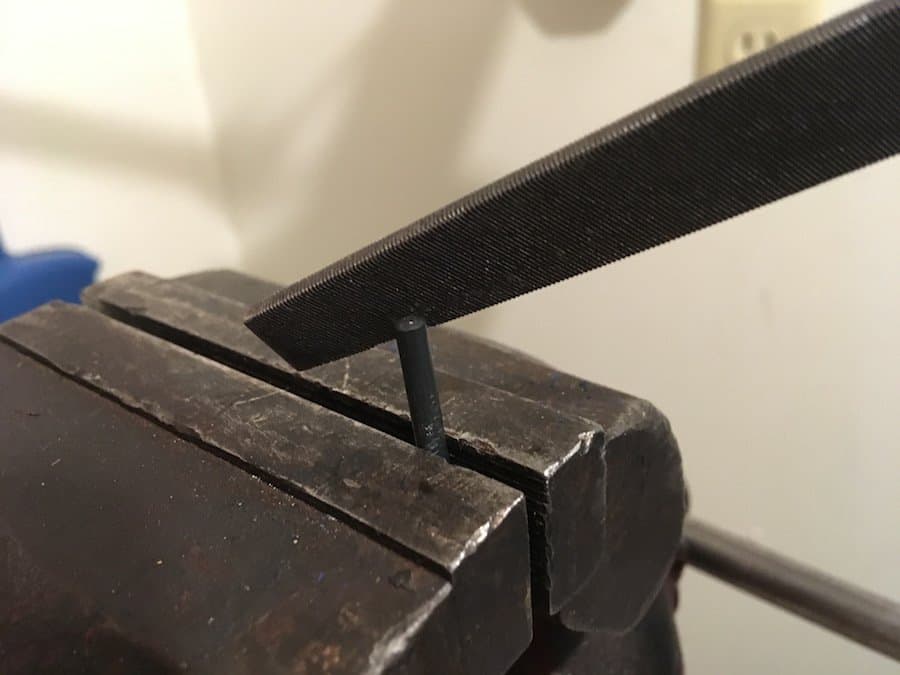
How to Make Slave Pins for Gunsmithing

To make a slave pin, find a drill bit or piece of metal bar stock that is just slightly smaller in diameter than the pin that held the pieces into the gun. A slave pin needs to be small enough that it can be moved without tapping it with a hammer but not so small that the parts being held in place shift around.
After you find a suitably-sized drill bit or other items, measure the length of the original pin. Depending on the application, the slave pin may need to be longer, shorter, or the same size as the original. Use a Dremel tool or hacksaw to cut the pin to the desired length. If you are using a drill bit, only use the solid round portion of the drill bit. Do not attempt to make a slave pin out of the grooved drilling surface.

After you cut the pin, add a slight bevel to each end. This will allow the pin to move freely when needed without it getting caught on other parts. Various tools are suitable for adding bevels to slave pins. Bench grinders, files, rotary tools (like a Dremel), are a few examples of tools you can use for this purpose. If you do not have any specialized tools, an electric drill will do the job. Place the slave pin in the drill’s chuck. Turn it on, and set a file against the pin as it is rotating. This will add a bevel to that end. After that, flip the pin around and repeat on the other side. As a finishing touch, you can use fine-grit sandpaper to smooth everything out. This will help the slave pin move as needed.
Forceps or Hemostats

Forceps or hemostats are the small locking clamps that doctors and nurses use to hold needles while sewing stitches. In addition to their medical uses, they also work well as cheap gunsmithing tools. One of my favorite uses for them is to hold the top of a pistol’s magazine catch spring while using pliers to compress the other end. This makes reinserting the spring into the frame much easier. Many magazine catch springs on handguns are y-shaped and have a bad tendency to slip and become airborne while being compressed. Using the hemostat to hold the top of the spring helps prevent it from flying through the air if the pliers slip.
Spanner Bits

A spanner bit is a very cheap tool that can make gunsmithing much easier. It is a special screwdriver tip that looks like a flathead driving bit with a notch taken out of the center. They are frequently found in “security bit” sets and are most commonly used to install and secure items that need to be tamper-proof, like bathroom stalls and certain electronics.
The forked end of a spanner bit makes it a superb tool to use when lifting springs out of the way or setting them in place. Unlike a dental pick, spanner bits are less likely to slip off of the spring and are easier to control.
Parts Holders
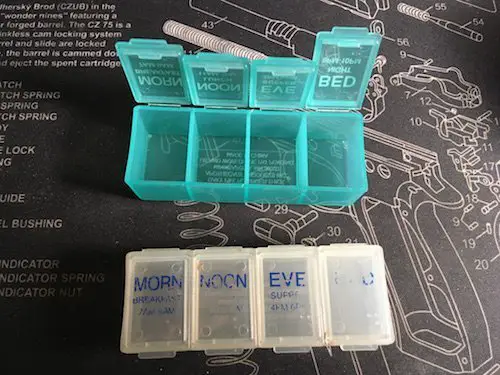
Many gun parts are very small, which makes it easy to lose and hard to keep organized. I have found that using parts holders to keep small springs, pins, and other pieces organized makes things harder to lose. They also help me keep related bits and pieces together.
For this task, I like to use pill organizers. Pill organizers are what your grandma uses to make sure that she doesn’t forget to take her 50 different pills each day. They have several small compartments that can open easily but do a pretty good job staying closed.
During disassembly, I will place all of my pins, springs, and other small parts that go together in one of the pill holder’s slots. Then, I’ll use a different slot for another sub-assembly. This helps prevent me from mixing parts and springs up and putting them in the wrong spot. In addition, pill organizers don’t take up too much space on your bench.
Cold Blue Solution
If you have any firearms that have a blued finish, you will eventually have areas of your gun where the bluing wears off. Hot bluing, the process by which a firearm obtains a beautiful dark blue or black finish, is a dangerous hot mess. The chemicals used are highly corrosive and need to be heated in tanks with propane burners. The disassembled gun parts are then lowered into the tank of boiling-hot corrosive liquid. Very few people are set up to do this sort of work, and as such, it can get pretty pricy to have it done well.
However, if you just need to touch up a couple of scratches or wear spots, the process is much more simple and a little safer. You can use cold blue solution for these minor fixes. When used over a small area, it should do a decent job blending into the existing finish. It isn’t perfect, but from a distance, can look very presentable. In addition, a cold-blued surface is less likely to rust than exposed steel.
Related: How to Cold Blue a Gun
Conclusion
This is nowhere near a complete list of cheap tools that can make gunsmithing easier. Every person who has worked on firearms has developed their own cheats and hacks to get the job done. If you know of a cheap tool that makes gunsmithing easier, please share it in the comments section.
If you enjoyed this article, take a look at these also:
Essential Gunsmithing Tools
How to Build a Spare Parts Kit for Your Guns
Complete Guide to Gunsmithing Punches
Brownell’s Magna-Tip Screwdriver Set Review
Essential Gun Cleaning Tools
How to Repair a Damaged Gun Screw
Ruger 10/22 Sight Removal and Replacement
Essential Reloading Equipment: Introduction to Reloading
How to Clean a Semi-Automatic Pistol