How to Cold Blue a Gun

Over time any gun’s finish can start to wear off. Failing to touch up problem spots, or if the problem is severe enough, not refinishing the gun can eventually result in damaging rust.
While most people use cold blue to touch up small areas, it can also be used to refinish an entire firearm. If you use care, the results can look very nice and provide some level of protection for the metal.
Hot bluing may be the preferred (and better) way to refinish an entire gun. However, cold bluing can work well if you want to do it yourself or can’t afford to pay someone to refinish your gun. I’ll explain the steps that I took to refinish an old .22 rifle, however, these steps can be applied to touch-up work as well.
Materials You Will Need
Gloves
I used two types of gloves for my project. I used disposable nitrile gloves for sanding and thicker kitchen gloves for the actual bluing.
Sandpaper
You will use sandpaper to remove the old bluing and any rust that is present. Get two packages of sandpaper, one 320-grit and one 600-grit. You may want to get the 320-grit in the large square sheets since you may need a lot of it.
0000 Steel Wool
The steel wool will be used to buff the cold blue between coats. It will help even out the finish without causing scratches or removing too much bluing.
Cold Blue Solution
There are a lot of cold blue solutions on the market, but the one that I use is Brownell’s Oxpho-Blue. Everything that Brownells produces is intended for professional gunsmiths.
Oxpho-Blue looks good and does a decent job of protecting the metal. I put some of it on an old bench vice’s anvil a few years ago and it is showing no signs of rust. This is impressive considering I live in a humid environment and keep the vise my garage which isn’t climate-controlled.
You can find Brownell’s Oxpho-Blue by clicking here.
Large Gun Cleaning Patches
You can use gun cleaning patches to apply the cold blue solution, water, and oil to the gun. Some people use other things to apply the bluing but I found that gun cleaning patches work just fine. Plus, you probably have them in your gun cleaning kit anyway.
Q-Tips
Cotton swabs work well to get into hard-to-reach places. Like the gun cleaning patches, they can be used to apply cold blue solution, water, and oil. They are also a much better choice to use when applying these things to small parts, such as screws.
Paper Towels
During the cold bluing process, you will need to use water to help stop the chemical reaction caused by the solution. Paper towels work well to quickly dry large parts, such as barrels and receivers.
Acetone
Any oil that remains on the firearm or any small part being blued can prevent the solution from working the way that it should. A degreaser such as acetone can quickly remove such contaminants.
I used acetone because of how quickly it dries. Note: Be very careful when using acetone. It gives off strong fumes and can eat through certain types of gloves. (Harbor Freight’s blue nitrile gloves can get eaten up after prolonged contact.)
Heat Gun
Cold blue, despite what the name suggests, works best on guns when the metal is heated. A heat gun works well to heat both small parts and large assemblies.
Bench Vise with Rubber Jaws
You will need something to hold parts securely while you are applying the cold blue solution. I have found that a stationary bench vise with a swiveling base is the best tool for this job.
Having removable rubber vise jaws will allow you to secure parts without having to worry about damaging the finish. This set is very similar to mine and has a channel in the middle that allows you to hold long cylindrical pieces, such as barrels and receivers.
Gun Cradle (Gun Vise)
A gun vise such as Tipton’s Best Gun Vise works well to help disassemble firearms and keep parts organized. When working on long guns, it is a good place to keep stocks safe and out of the way.
Scrap Wood
If you are refinishing an entire firearm you will need to construct a vise block to hold larger parts securely but still allow you to finish as large of an area as possible at once. A scrap 2×4 is what I used. I’ll explain how to make such a vise block later in the article.
Water Cup
You will need to use water to help stop the cold blue’s chemical reaction in between coats. A large cup with water works well to soak cleaning patches in for this purpose. I try to avoid running parts under water to help prevent rust.
Gun Oil
You will need some gun oil after you are finished applying coats of cold blue to your gun. This will help protect the metal and may even help the finish look better.
Barrel Stopper
You will need something to stop up your barrel to prevent cold blue solution from going down your gun’s bore. You could use a wooden dowel or a piece of rubber. Just make sure that whatever you use makes a good seal but will be easy to remove.
Disassemble the Firearm
After you have gathered your materials, the next thing that you need to do is disassemble the firearm as much as you can. Cold blue is some pretty corrosive stuff, so you don’t want it to seep down and get somewhere that you cannot neutralize it. It can damage the finish on wood as well.
If you are refinishing an entire rifle or shotgun then you need to remove the barrel and receiver from the stock. For handguns, be sure to remove the grip panels. Youtube is an excellent place to learn how to disassemble specific models of firearms.
If you cannot find a video for your firearm, an armorer’s manual or other written reference may be available. Be careful to only disassemble what you need to and what you are capable of putting back together. Having to take a firearm to a real gunsmith because you can’t reassemble it is an embarrassing trip to the gun shop.
Be sure to use the proper tools while disassembling and reassembling your firearm. Guns require specific types of tools and failing to use the right ones will almost surely result in damage to your gun. I have already written several articles about gunsmithing tools which you can find by clicking the links below.
- Essential Gunsmithing Tools
- Companies that Make the Best Gunsmithing Tools
- Complete Guide to Gunsmithing Punches
- Brownell’s Magna-tip Screwdriver Set Review
Remove the Old Finish and Rust
After the firearm is disassembled you will need to remove the old finish as well as any rust that is present. I started out with 320-grit sandpaper for this.
320-grit is a good choice for removing a lot of finish and rust but isn’t so abrasive that it creates really deep scratches. Just like wood, metal has a grain that you should sand along with. Sanding with the grain will look smoother while sanding against it will look rougher.
I cut my sandpaper into strips that were about 3-4 inches long and 1/2 an inch wide. This allowed me to sand in a “shoeshine motion” and wrap the paper around the parts when necessary. It worked especially well on the barrel.
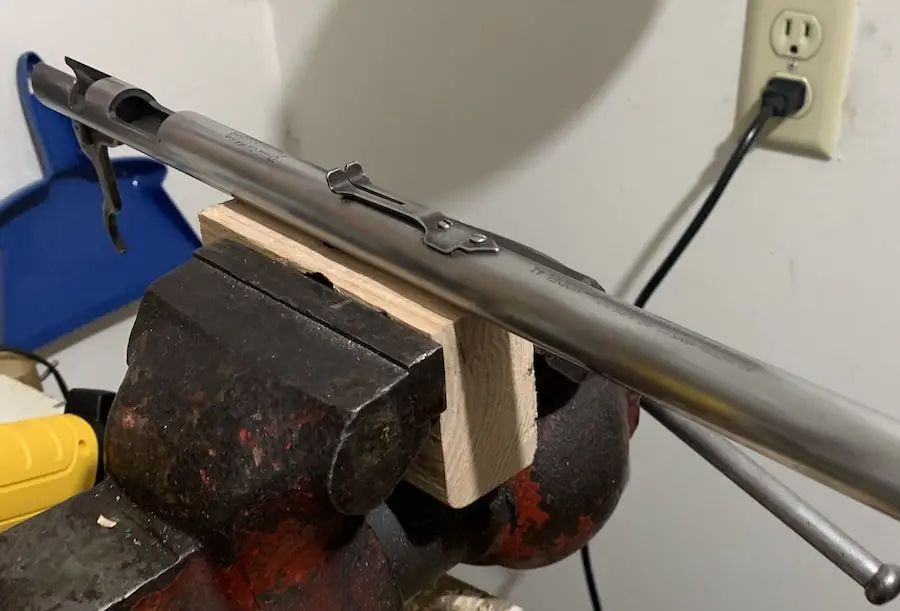
Pay special attention to problem areas such as fixed sights that cannot be removed or other parts that you couldn’t take off. The rifle that I re-blued was so old that removing the rear sight would have caused more damage than it was worth. I had to be very careful and have good attention to detail while sanding around it.
(That is one area on the finished product that I’m not happy with. I should have done a better job removing the old finish around the rear sight. You can still see it in the picture above.)
Once the old finish and rust have been removed, move onto the 600-grit sandpaper. This will give the metal a smooth and glossy look. I wanted a smoother finish because cold blue doesn’t protect metal from rust as well as hot blue does.
My thinking was that a smoother surface will A) Look nice and B) Have fewer imperfections for water to settle in and cause problems later on.
Just like with the 320-grit sandpaper pay close attention to what you are doing. The better job that you do smoothing everything out with sandpaper, the better the gun or parts will look after you have applied the cold blue.
While disassembling the gun and removing rust, you may have some screws that look damaged. This is usually the result of someone trying to remove them using improper screwdrivers.
Now is the best time to repair any damaged screws. You can see detailed instructions for how to do this on my article, How to Repair a Damaged Gun Screw by clicking here.
Make a Bluing Vise Block
If you are going to cold blue an entire firearm then you will need to make something to hold large pieces in the vice. You want it to hold the part securely but still allow you to blue as much of the surface at once as possible. I used a scrap 2×4 that I cut and drilled to hold the barrel and receiver. You can see a picture of it below.
My bluing vise block acted as a miniature stock that held the assembly in place while I blued it. The only area of the metal that I wasn’t able to blue with the rest of the assembly is hidden by the stock when the firearm is reassembled. I re-blued it separately after I had applied some coats of cold blue to the rest of the barrel and receiver.
How to Create a Vise Block for Cold Bluing
For most rifles, a 2×4 scrap of around 5 inches should be sufficient. It should provide enough support without being too large. However, if your gun has a very long barrel, a larger piece may be needed.
Most rifles will have a lug that protrudes from the bottom of the barrel or receiver and fits into the stock. Determine how tall and wide this lug is and drill a hole into the center of the narrow side of the 2×4. The hole should fit the lug as closely as possible.
Next, determine how long the screw is that holds the stock to the barrel or receiver. You will also need to know how wide the shaft of the screw and the screw head are.
Drill a hole that is slightly wider than the screw’s shaft into the center of the hole that you made for the lug. Drill all the way through the 2×4.
Now drill a hole from the bottom side that is slightly larger than the screw’s head. You want the bottom of this hole to be roughly the same distance to the bottom of the lug hole as the bottom of the screw head is from the threads.
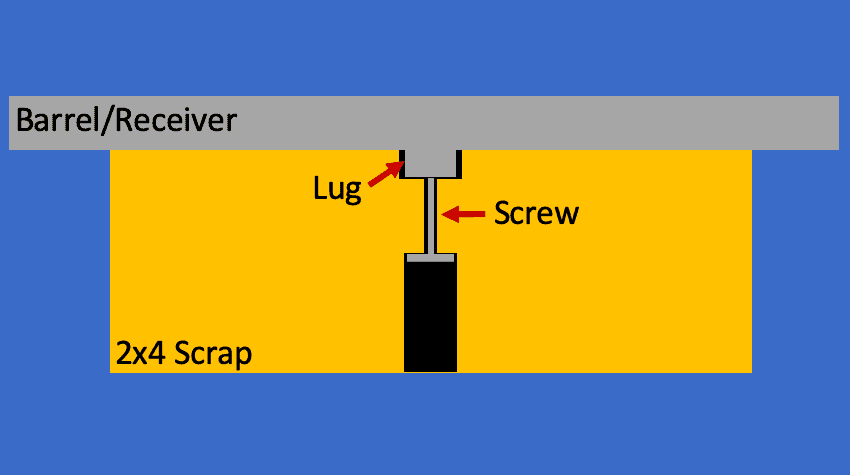
If you drilled too far for the last hole, you can use washers to tighten things up. Secure the barrel and receiver to this vise block the same way that you would to the stock. Then place the 2×4 into your vise.
Clean and Degrease All Surfaces
After you have secured the barrel and receiver to the vise block then you are ready to start preparing the gun for the cold blue solution.
If you haven’t already done so insert the stopper into the end of your firearm’s barrel. This will prevent the cold blue solution and water from getting into the bore.
Use a degreaser, such as acetone, to clean the surface and remove all residual oil and grease. I used blue shop towels for this and they worked well.
Apply a generous amount of acetone to your paper towel or rag and wipe down all surfaces that you will be applying the cold blue to.
Note: Acetone and other degreasers give off harmful fumes and can cause skin irritation. Be sure to use gloves and have good ventilation.
Heat the Parts
Now you will want to heat the metal. This will help the cold blue solution work better.
If you are only bluing small parts such screws or trigger guards a hair dryer may be sufficient. However, if you are refinishing larger parts or an entire rifle a heat gun is a better choice. You could also use a torch, but this is less safe and easier to overdo.
When heating large parts, keep the heat gun close to the part (less than an inch) and use slow and steady passes. This will help the part heat evenly. You will likely need to do multiple passes going over the part’s different sides.
Apply the Cold Blue Solution
Now you are finally ready to start applying cold blue solution to your gun. Get several cleaning patches ready for the next few steps.
Keep the cold blue solution’s bottle closed until you are ready to start applying it to surfaces. You will also want to close it as soon as you have saturated a cleaning patch or cotton swab.
Dip a cleaning patch (or cotton swab for small parts) into the cold blue solution. Wipe it as evenly as possible over the entire area that you want to be blued.
A well-saturated cleaning patch should be able to coat an entire barrel and receiver with cold blue solution.
When you apply the solution you will notice all sorts of different colors appearing. Some spots will appear to rust instantly. This is normal and will be taken care of in the next step.
Allow the solution to sit on the part or assembly for about a minute.
Apply Water to the Part
Now you will need to apply water to the part or assembly that you just applied cold blue solution to.
Take another cleaning patch and dip it in your cup of water. Rub this patch all over the area that has been exposed to the cold blue solution.
This will help stop the solution’s reaction with the metal. Be sure to get water into any small areas that may have been exposed to the cold blue solution.
You will also notice that most of the discoloration has been wiped away. The metal should be darker and will likely have blotches. Many of these imperfections will be removed in the next step.
Use a paper towel to dry the part as much as possible. Take special care to dry small crevices.
Buff and Polish
Now you will use 0000 steel wool to remove any residual cold blue solution and help even out your work.
Use the steel wool to scrub the entire piece that you have cold blued. You will remove the dark top layer and be left with the shiny gray finish underneath.
Don’t be afraid to really buff uneven areas. The 0000 steel wool isn’t enough to damage the firearm and any unevenness that this causes will be taken care of in subsequent coats.
Any blotchy or uneven spots must be buffed out before applying the next coat. If not, they could show through later coats as well as the finished product.
After the first coat, the metal should be slightly darker than it was before. It will not be super dark after the first coat but you should be able to tell a difference.
Add More Coats of Cold Blue
After you have applied the first coat of cold blue solution, then you will need to repeat the following steps:
- Clean and degrease
- Heating
- Apply cold blue solution
- Wipe the part with water and dry it
- Buff and polish
If you are going to refinish an entire firearm or large parts, I recommend using around 8 coats of cold blue. This should get the metal about as dark as it will get and make the finish as even as possible.
If you needed to secure parts to a vise block like I did, I recommend doing 5 coats on every area that you can reach.
Then remove the part from the vise block and secure it in a padded vise so that you can reach what was obstructed by the vise block. Do all 8 coats on the area that is normally obstructed and coat it with oil.
Afterwards, reattach the part to the vise block and complete the final three coats on all the areas that you can reach.
Following this 5-8-3 pattern will allow you to finish the entire piece while making sure that any visible area can be touched up after being secured in a vise.
I don’t recommend trying to finish the obstructed area first since it may be difficult to tell what places you will be able to reach.
If you have a mix of large parts (barrels, receivers) and small parts (screws, trigger guards) I found that it is best to focus on large parts individually. They require a lot of concentration, especially when buffing.
Small parts can be batched and worked on several at a time.

Apply Oil
After you have applied all 8 coats of cold blue solution to the firearm, then you need to thoroughly oil the part.
This does a couple of things. First, it helps protect the metal. Second, it seems to help the finish darken slightly.
I like to apply a coat of oil to the entire surface that is a little thicker than what I would normally use for regular maintenance. This then sits on the gun overnight.
The next day, I’ll remove this coat of oil with a cleaning patch and apply another coat of oil that is more in line with what I normally use.
Reassemble the Gun
After you are done cold bluing your gun, then it is time to reassemble it. Be sure to exercise care when driving pins or tightening screws. You don’t want to mess up your work.
Going forward it is a good idea to regularly inspect your work to ensure that it is still well-oiled and free from rust.
Cold blue finishes aren’t as rust-resistant as hot bluing is. However, with care, a cold blued gun can look good for several years.