
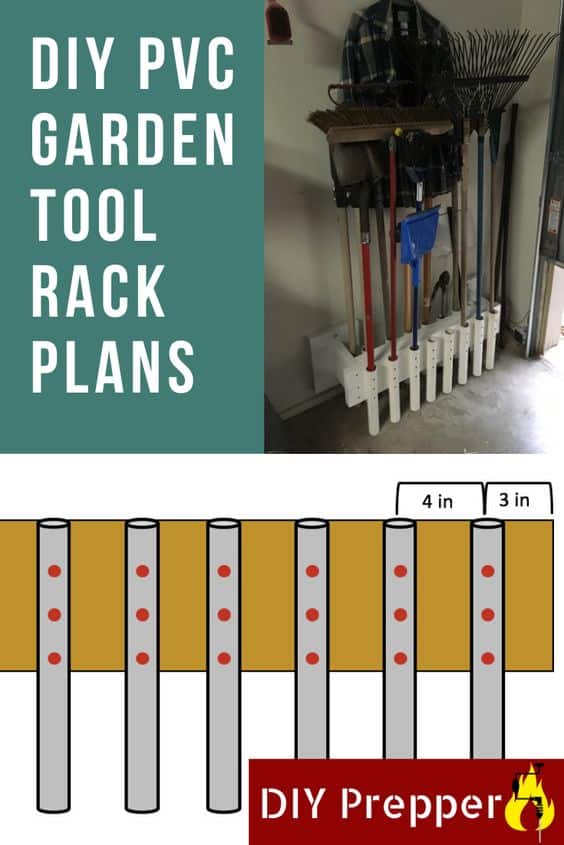
Garden tools, such as shovels and rakes can take up a lot of space. This is especially true if they are just laying against the wall in your shed or garage. To solve this problem, I built a DIY garden tool rack out of common lumber and PVC pipe to keep my garden tools organized.
This tool rack takes up less than 3 1/2 feet of wall space and sticks out less than 13 inches from the wall. It will hold up to 15 garden tools. Here is how you can build your own PVC garden tool rack.
Materials Needed
- One 2x8x8
- One 2x10x4
- (2) 10 ft Long 1 1/2 inch PVC Pipe
- 2-Inch Wood Screws
- 3-Inch Wood Screws
- 2 1/2-Inch Pocket Hole Screws
- Sliding Miter Saw or Circular Saw
- Hack Saw
- Cordless Drill
- Impact Driver (Optional, but will make your life easier)
- Twist Drill Bits
- Phillips Head Drive Bits
- SQ 2 Drive Bits
- Tape Measure
- Sharpie with both fine and regular tips
- Paint (Optional)
Related: Power Tools Preppers Need
Step 1: Determine Your Stud Length
The first step to building your DIY garden tool rack is to determine how far apart your studs are. If you are going to attach the holder to bare studs, just measure the distance between the studs you will be attaching it to. If you are going to install it on studs that are covered by drywall, you will need to use a stud finder.
Usually, studs are either 16 or 24 inches across, however it is best to get an exact measurement for the studs you will be attaching your rack to. All measurements in this article will assume 16-inch center studs. If you have 24-inch center studs, be sure to adjust the measurements.
Step 2: Make Cuts for the Garden Tool Rack’s Body
Next, you will make the cuts for the body of the tool rack. These cuts will be made from your 2x8x8. Make your first cut 36 inches long. This will be your tool holder’s “front board”. Then, make another cut at 30.5 inches long. This will be the “backboard” of your tool holder.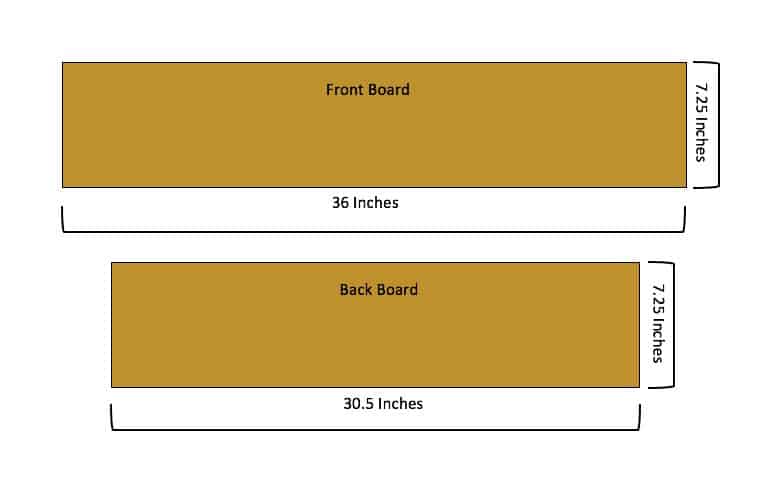
Step 3: Assemble the Tool Holder’s Body
Place the 36-inch board on your workbench and place the 30.5-inch board on top of it. Center the shorter board so that there are 2.75 inches of the longer board on each side of the shorter board. After you have them centered, use 2-inch screws to attach the two boards together.

Step 4: Make Cuts for the Mounting Brackets
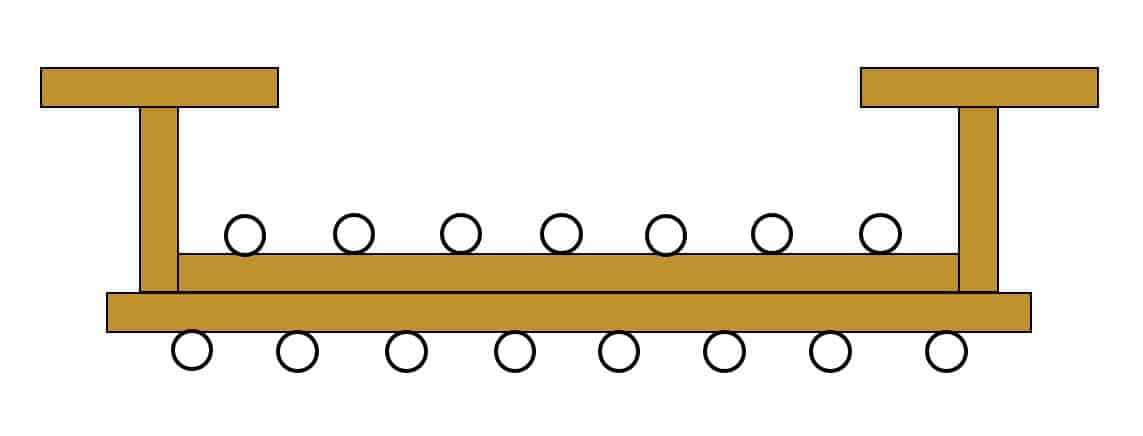
Take what remains of your 2×8 and make 2 cuts at 7.25-inches each. These will be what I refer to as extenders. They will provide space between the body of your garden tool rack and the wall. Set them aside after you make the cuts.
Now, you will need to get your 2×10 and make two cuts from it, each measuring 12.25 inches. These will be “wall plates”. They will attach to the extenders and hold the entire garden tool rack to the wall.

Step 5: Assemble the Mounting Brackets
Take each 12.25-inch section of 2×10 and drill a pilot hole in the center of each board. Then, add an additional pilot hole 2 inches above and two inches below the center hole on each board. These are represented by the red dots on the center illustration below.
Use c clamps to hold the extenders onto the wall plates. I use two clamps, one on each side to do this. Drive 3-inch screws through your pilot holes to attach the extenders and wall plates together. Make sure the screws are flush with or slightly below the surface of the wood. This will prevent problems when you try to mount it to the wall later. 
Step 6: (Optional) Paint Garden Tool Rack Pieces
If you want to paint your DIY Garden Tool Rack, do this now before you assemble the rest of the pieces. It will be much easier to paint the mounting brackets and rack body before they are assembled.
Step 7: Cut PVC Pipes
The next step to building your DIY Garden Tool Rack is to cut 15 segments of PVC pipe. Each segment will need to be 14-inches long. I used a hacksaw to cut my PVC pipes.
Step 8: Drill Holes in the PVC Pipe
After you cut your PVC pipes, you will need to drill holes in them. I drilled three separate holes in each piece of pipe. To ensure that they line up, you will need to mark a straight line down the length of each piece. Place the pipe on your workbench and hold it steady. Then, take a sharpie and lay it flat on the workbench with the tip against the pipe. Slide the sharpie across the workbench, marking the pipe as you go. This should produce a fairly straight line.
After you make your line, mark where you want your holes. I drilled holes at 2, 4, and 6 inches from one end of the pipe. This will allow you to drive screws through your PVC pipes, securing them to the body of your garden tool rack. Use a tape measure or speed square to make these marks.
You will need two drill bits for this. The first will be a 3/16-inch drill bit. The second will be a 3/8-inch drill bit. Drill all the way through the pipe with your 3/16-inch drill bit. Make sure to keep the drill bit centered and as straight as possible while you are doing this.
After you have drilled all the way through your PVC pipes with the smaller drill bit, use the 3/8-inch drill bit to enlarge the holes on one side of the pipe. This will allow you to fit your pocket hole screws all the way through this hole. The smaller hole will allow the screw’s shank to pass through but not the head, which will firmly attach the pipes to the garden tool rack’s body.
Tip
When opening up the holes with the larger bit, do this on the side that does not have the markings on it. Doing so will place the marks against the body of the garden tool holder, hiding them. 
Step 9: Attach PVC Pipes to Garden Tool Rack’s Body
After you have cut your PVC pipes and drilled holes in them, it is time to attach them to your DIY Garden Tool Rack’s body. To do this, I used 2 1/2-inch pocket hole screws. Start on the long side of your rack’s body. Place the vertical center of the first pipe (where the holes are) around 3.5 inches from the end of the board. Attach the pipe so that its top is flush with the top of the tool holder’s body.
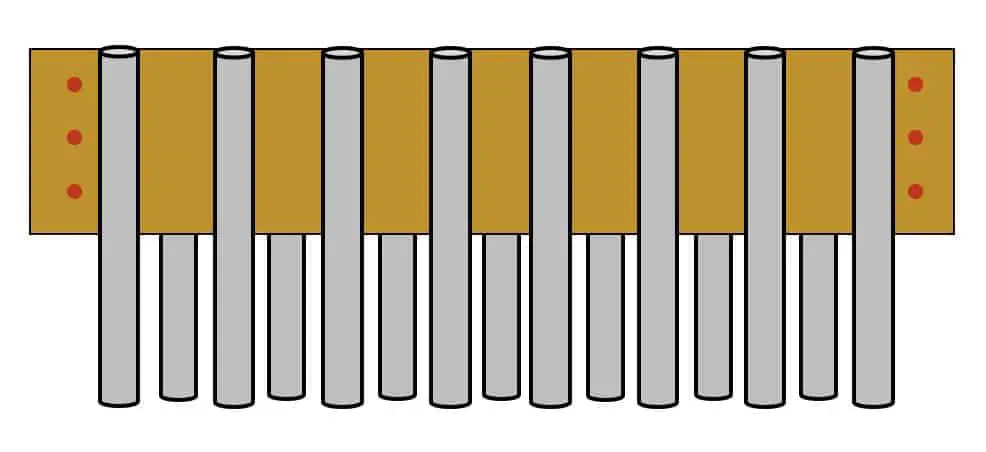
Place the vertical center of each pipe after that 4-inches from the last. You may need to adjust these measurements slightly to avoid running into the screws you used to attach the tool holder’s body together. 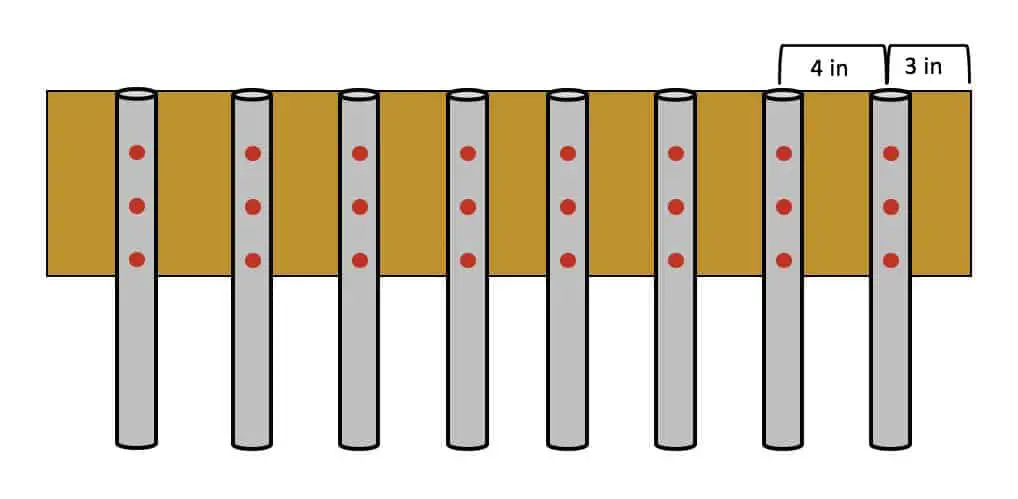 After you finish attaching pipes to the long side of your garden tool rack’s body, turn it over and attach the remaining pipes to the other side. Place these in the spaces between the pipes on the other side of the tool rack’s body. This will produce a zig-zag pattern that will make it easier to place garden tools in the rack and take them out again.

Step 10: Attach Mounting Brackets to Tool Rack’s Body
Next, you will need to attach the mounting brackets to your DIY Garden Tool Rack’s body. Drill three pilot holes into each end of the tool holder’s body. Set the mounting brackets on a flat surface and place the tool holder’s body on top of them. Use 3-inch wood screws to attach the tool holder’s body to the mounting brackets.
Step 11: Mount the Garden Tool Rack to the Wall
The last step is to attach your new Garden Tool Rack to the wall. I mounted mine so that the pipes were almost touching the ground. However, you may want to mount yours so that the pipes have an inch or two of space between them and the ground.
I placed mine low so that I can add a shelf above it later and still be able to remove and replace tools. Use 3-inch wood screws to mount the garden tool rack to the wall. I added a slight countersink into my wall plates to allow the screws to go a little deeper into the studs.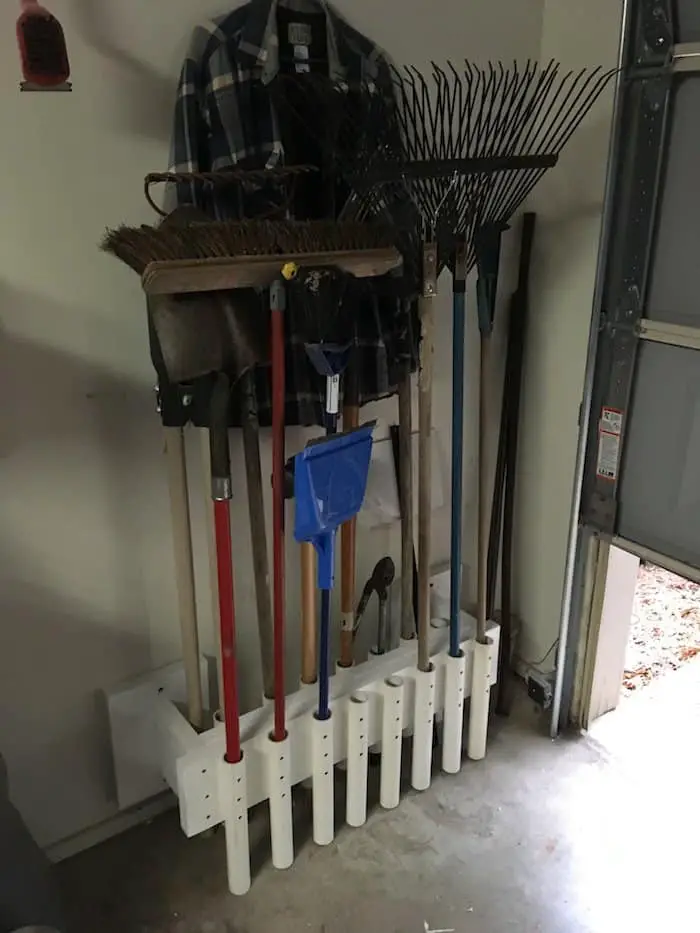
If you liked this article, take a look at these:
DIY Laundry Folding Table
Tool Belt Setup
Power Tools Every Prepper Needs
Build a Complete Prepper Tool Kit: Tool List and Tips
How to Get Good Tools Cheap
Power Tools and Prepping
What Every Prepper Needs to Know About Harbor Freight
Best Harbor Freight Free Items
Milwaukee M18 Lantern and Floodlight Review