How to Level a Rifle Scope: 3 Ways that Actually Work
If you are going to install a scope on a rifle, you need to make sure that it is level. This will make it easier to sight the scope in and allow you to make accurate adjustments while shooting.
Three of the most common ways to level a rifle scope are:
Each one of these methods, if done correctly, will help ensure that your rifle scope is level and in line with your rifle’s bore. Here is how to use each method to level a rifle scope. I have also included some information on how to use a plumb bob to check your work and why it is important to level rifle scopes in the first place.
*Note: When following these steps, it is already assumed that the scope rings have been installed onto their base. These steps only detail the actual leveling process.
Safety First
Before you attempt to install a scope on a rifle, you must make sure that the gun is unloaded. I even like to remove the bolt from the rifle before I begin the process. This will make it impossible for the gun to go off.
Also, be sure that the gun is pointed in a safe direction as you are working on it. Safe means that it isn’t pointed at anyone and no one can accidentally walk in front of it. Doing these things will help ensure an accident doesn’t happen.
Rifle Scope Leveling Method 1: Line Levels
Line levels, also known as string levels, are tools commonly used in construction for leveling over a long distance. They consist of a spirit level set into a frame that has hooks to fit over a line. The best line levels to use for leveling a rifle scope are those with aluminum housings, such as these. You will need two of them to do the job properly.
How to use line levels to level your rifle scope:
- Set the rifle in a gun cradle or gun vise. Then find a flat place on the receiver or scope base and place one of the line levels onto it. Adjust the gun in the cradle or vise until the level’s bubble is in the middle of the vial. Secure the gun in place so that it won’t move.
- Place the scope into its bottom rings and sit the ring’s top sections in position. Insert the screws into the scope rings and begin to tighten them. Do not tighten them so much that you cannot adjust the scope.
- Remove the cap from the elevation adjustment knob (the one on top of the scope) and place the second line level centered on top of it. Rotate the scope until the level’s bubble is in the middle of the vial.
- Check the level on the receiver to make sure that it is still in position and showing that the firearm itself is level.
- Next, begin tightening the screws on the scope rings. Only tighten each screw a little bit at a time and alternate between screws. This will reduce the chances of the scope turning while tightening the screws. Be sure that the levels on both the receiver and the scope remain level throughout the tightening process.
- Finally, use a torque wrench to properly torque each screw. Again, ensure that both the scope and rifle remain level.
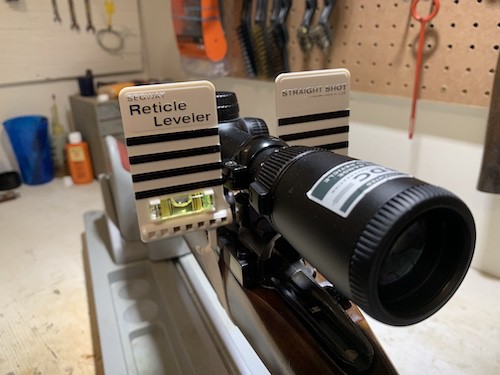
Rifle Scope Leveling Method 2: Segway Reticle Leveler
 The Segway Reticle Leveler is the tool that I used when I did my first rifle scope replacement. It is a very simple device that allows you to level the rifle and scope with just one tool.
The Segway Reticle Leveler consists of a brass bar that holds two plastic wings with horizontal lines painted on them. A spirit level is attached to one of the wings which allows you to make sure your rifle is level. A rubber band goes around the gun and hooks into each of the plastic wings. This holds the whole thing in place.
The Segway Reticle Leveler can also be used while shooting to ensure you are holding the gun level, which could be very beneficial on long-range shots.
How to use a Segway Reticle Leveler to level your rifle scope:
- Set the rifle in a gun cradle or gun vise.
- Place the scope into its bottom rings and sit the ring’s top sections in position. Insert the screws into the scope rings and begin to tighten them. Do not tighten them so much that you cannot adjust the scope.
- Remove one section from the Segway Reticle Leveler. Place the brass bar on top of the scope base underneath the scope.
- Slide the other side of the reticle leveler back onto the brass bar.
- Hook the rubber band onto one of the plastic wing’s hook, pass it underneath the gun, and attach it to the hook on the other plastic wing on the other side of the gun.
- Ensure that the brass bar is sitting directly on top of the scope base and not tilted to one side of the other. After this, use the level on the reticle leveler to adjust the rifle in the gun cradle until it is level. Secure the rifle in place.
- Use the horizontal lines on the Segway as references to visually level the rifle scope’s horizontal reticle.
- After the horizontal reticle is lined up with the bars on the Segway, begin tightening the screws on the scope rings. Only tighten each screw a little bit at a time and alternate between screws. This will reduce the chances of the scope turning while tightening the screws. Check the bubble level on the reticle leveler and the horizontal bars as you go to ensure nothing has shifted.
- Finally, use a torque wrench to properly torque each screw. Again, ensure that the rifle and reticles remain level.
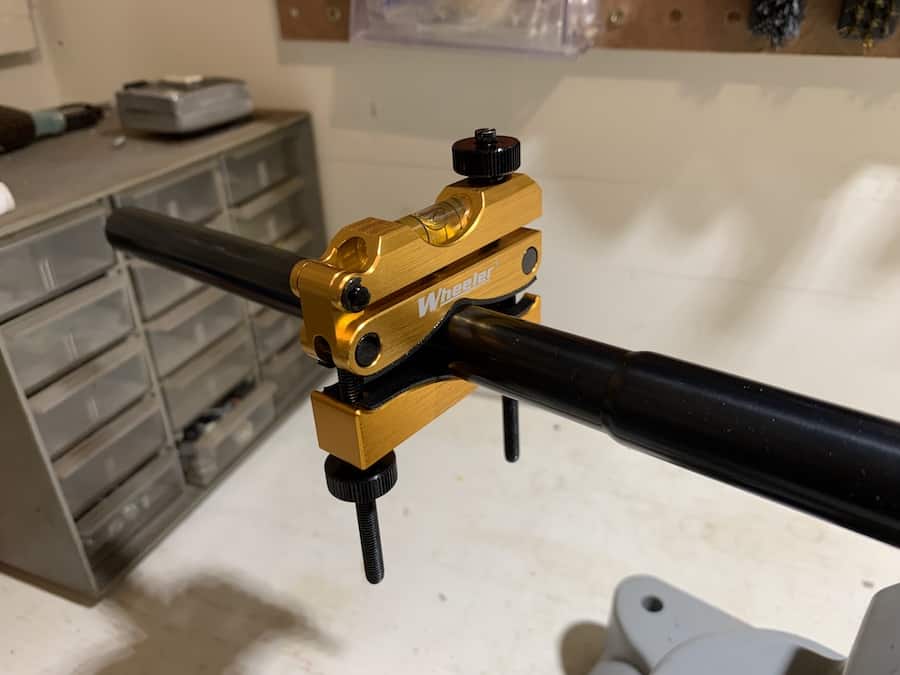
Rifle Scope Leveling Method 3: Wheeler Engineering Professional Reticle Leveling System
 Wheeler Engineering’s Professional Reticle Leveling System is one of the nicest reticle leveling tools available. It consists of two levels, a reference level, and a barrel clamp level. Both of them are constructed of machined aluminum and can be recalibrated if necessary. It also includes a nice case that keeps both levels well-protected.
How to use Wheeler Engineering’s Professional Reticle Leveling System to level your rifle scope.
- Set the rifle in a gun cradle or gun vise. Then find a flat place on the receiver or scope base and place the reference level on top of it. (The reference level is the smaller one.) Adjust the gun in the cradle or vise until the level’s bubble is in the middle of the vial. Secure the gun in place so that it won’t move.
- Attach the barrel clamp level onto the rifle’s barrel. Make sure that the reference level on the receiver or scope mount is still showing that the firearm is level. If it is, adjust the barrel clamp level so it matches the reading on the reference level. Once it is attached, this is what you will use to ensure that the gun stays level. This will allow you to use the reference level on the scope in the next steps.
- Remove the small reference level and set it aside. Place the scope into its bottom rings and sit the rings’ top sections in position. Insert the screws into the scope rings and begin to tighten them. Do not tighten them so much that you cannot adjust the scope.
- Remove the cap from the elevation adjustment knob (the one on top of the scope) and place the reference level centered on top of it. Rotate the scope until the level’s bubble is in the middle of the vial.
- Check the barrel clamp level to make sure that the firearm is still level.
- Next, begin tightening the screws on the scope rings. Only tighten each screw a little bit at a time and alternate between screws. This will reduce the chances of the scope turning while tightening the screws. Be sure that the reference level and barrel clamp level remain level throughout the tightening process.
- Finally, use a torque wrench to properly torque each screw. Again, ensure that both the scope and rifle remain level.
Check Your Work With a Plumb Bob (or Chalk Line)
 Regardless of which reticle leveling method that you use, you still need to check your work. This is especially true if you used either line levels or the Wheeler System. While both methods are reliable, they only work if the rifle scope’s vertical reticle and elevation turret are properly aligned. A simple plumb bob can be used to check this.
Mankind has been using plumb bobs for thousands of years. You can pick one up pretty cheap by clicking here. If you have a chalk line, you can use it as a plumb bob as well.
Here’s how to use a plumb bob to ensure your rifle scope is level:
- Start by hanging the plumb bob from a nail. Brightly-colored string works really well for this since it stands out from the background. Next, place your rifle in a gun cradle or gun vise.
- Use a line level, the Segway Reticle Leveler, or the Wheeler Reference level to ensure that the firearm is level. Once it is level, secure it in your vise so that it is pointing at the plumb bob’s string.
- If both the firearm and scope are level, the string should run directly along or parallel to the scope’s vertical reticle.
- If the scope isn’t level, loosen the scope ring screws and adjust the scope. After you are finished, retighten them as you did earlier.
*Note: If you are confident that the reticles are not in line with the scope’s adjustment knobs, you may be able to return it to the factory. Call your scope’s manufacturer, explain the problem, and see what they are willing to do. This problem can occur even with scopes from good manufacturers.
Check Your Work with a 2-4 Foot Level
If you don’t have a plumb bob or chalk line, you can still check to make sure your reticle is level using a box or I-beam level. Take a large piece of paper and hang it up. Use your level to mark a thick vertical line on the paper. Make sure it is perfectly vertical.
As with using a plumb bob, your rifle scope’s vertical reticle should be perfectly aligned with the vertical line on the paper when the rifle itself is level. If not, make minor adjustments by loosening the scope rings and rotating the scope as necessary.
Leveling a Red Dot Sight
 Red dot sights have quickly become one of the most most popular types of optics, especially on AR-pattern rifles. Many of them will not need to be leveled since they are already attached to a mount. For example, my Aimpoint was already attached to its mount when I opened the box. All I had to do was place it on my gun and sight it in.
However, some red dot sights will still need to be leveled if they didn’t come attached to a mount or if you decide to switch mounts. It isn’t as important during normal use as it is with traditional scopes since you don’t typically adjust them when shooting. However, it will make sighting them in much easier.
To level a red dot sight, first make sure the gun is level. Then place a line level or a Wheeler Reference level on a flat portion of the optic, such as an adjustment turret. A Segway Reticle leveler or plumb bob will not be of much use, especially if the scope only has a single red dot as its point of aim. Use the levels adjust the red dot as you would one with traditional reticles.
Should You Worry About Leveling a Rifle Scope?
Yes, you should definitely take the time to level your rifle scope. Even small discrepancies can cause major accuracy issues over long distances. Improperly aligned reticles can cause big problems when you are using turrets to adjust for windage and elevation.
For example, if you were trying to adjust your scope to address bullet drop at 500 yards, adjusting the elevation turret wouldn’t only affect where the bullet goes vertically. It would also change the impact point from a windage standpoint as well. The severity would depend on how badly the scope is canted to one side or the other.
An improperly leveled rifle scope would also be difficult to sight in for the same reasons. Once you manage to get the gun shooting on paper, dialing it in would be very difficult. Every time you adjust the elevation knob, windage would be affected. In addition, the elevation would be affected each time that you adjust the windage knob. The bottom line is that you could be sighting that gun in for a very long time.
Lastly, a rifle scope that hasn’t been properly leveled is distracting and difficult to use. Having a properly leveled rifle scope will help you shoulder the gun easier and hold it properly and consistently as you shoot.